Views: 0 Author: Site Editor Publish Time: 2025-08-25 Origin: Site


You can change a ceiling light fixture by first switching off power at the breaker and checking for electricity with a voltage tester. Safety comes first. Yunlu Lighting’s Ceiling Lights provide a modern, efficient solution. LED models use up to 90% less energy than old incandescent or fluorescent fixtures. You get easy installation with plug-and-play or magnetic mount options. Costs for replacing a fixture can range from $75 to $3,000, depending on size and complexity. Follow each step for a safe, stylish, and eco-friendly upgrade.
Always turn off the power at the breaker before starting any electrical work to prevent shocks.
Use a non-contact voltage tester to confirm that no electricity flows to the wires before touching them.
Wear safety gear, including safety glasses and insulated gloves, to protect yourself during installation.
Gather essential tools like a screwdriver, wire strippers, and a sturdy ladder to ensure a smooth installation process.
Choose a ceiling light fixture that matches your style and needs, considering energy-efficient options like LED lights.
Follow proper wiring procedures by matching wire colors and securing connections with wire nuts to ensure safety.
Use quick-mount brackets or magnetic bases for easy installation, especially if you are a renter or prefer a simple setup.
Test the fixture after installation to ensure it works correctly, and troubleshoot any issues before calling a professional.
Changing a ceiling light fixture starts with safety. You protect yourself and your home by following these steps before you touch any wires or tools.
Always turn off the power at the breaker box before you begin. Do not rely on just flipping the wall switch. Many accidents happen when people forget this step. Electrical shocks can occur if you leave the power on or if wires are not properly disconnected. Fire hazards may result from overloading circuits or using the wrong bulbs. Improper installation can damage your property or cause injuries.
Tip: Ask a friend or family member to help, especially if the fixture is heavy or awkward to handle. This extra set of hands can prevent accidents and make the process smoother.
After you turn off the breaker, use a non-contact voltage tester to check that no electricity flows to the wires. Hold the tester near each wire. If the tester lights up or beeps, the wire still has power. Do not continue until you confirm the wires are safe to touch.
Common mistakes during installation include mixing up wires or using the wrong connectors. Label wires as you disconnect them. Use the correct wire nuts to keep connections tight and safe. Always double-check that the power is off before you handle any wires.
Wear safety gear to protect yourself. Safety glasses shield your eyes from dust or falling debris. Insulated gloves help prevent shocks. Use a sturdy ladder that stands flat on the floor. Never stand on furniture or unstable surfaces.
Yunlu Lighting’s Ceiling Lights feature eco-friendly materials and safe designs. Many models come with quick-mount brackets or magnetic bases, which reduce the need for complex wiring and lower the risk of mistakes. When you select a new fixture, check for safety certifications. The table below explains common UL listing types:
| UL Listing Type | Description |
|---|---|
| Dry Rated | Safe for indoor use where there is no moisture, such as living rooms or bedrooms. |
| Damp Rated | Suitable for areas with some moisture, like bathrooms or covered porches. |
| Wet Rated | Designed for outdoor use where exposure to rain or snow is possible. |
Note: Yunlu Lighting offers fixtures with these safety ratings, so you can choose the right one for your space.
By following these safety steps, you lower the risk of electrical shocks, fire hazards, and improper installation. You also make the upgrade process easier and more enjoyable.
You need the right tools to change a ceiling light fixture safely and efficiently. Gather these items before you start:
Screwdriver: Use this to remove screws from the old fixture and secure the new one.
Wire strippers: Prepare the electrical wires for new connections.
Voltage tester: Check that the power is off before you touch any wires.
Ladder: Reach the ceiling comfortably and work at a safe height.
Having these tools ready helps you avoid mistakes and makes the installation process smoother. You reduce the risk of accidents and finish the job faster when you use the correct equipment.
Tip: Choose a sturdy ladder that fits your ceiling height. Never use a chair or unstable surface.
Select a new fixture that matches your style and needs. Yunlu Lighting offers Ceiling Lights with advanced LED technology. These lights provide bright illumination and save energy. You can find models with modern designs, such as minimalist chandeliers, ceramic lamps, or art deco styles. Many fixtures feature dimmable options, adjustable rods, and universal fit brackets.
Plug-and-play designs make installation easy. You do not need to handle complex wiring. Magnetic mounts allow you to attach the fixture quickly and reposition it if needed. These features help you upgrade your space without professional help.
Magnetic mounts let you install and adjust the fixture in minutes.
Plug-and-play options work well for renters or anyone who wants a simple setup.
Dimmable and battery-powered models offer flexibility for different rooms.
Note: Yunlu Lighting’s Ceiling Lights come with eco-friendly materials and safety certifications. You can choose a fixture that fits your room and meets safety standards.
Mounting kits include the hardware you need for installation. Most kits provide screws, brackets, and wire nuts. Some fixtures come with quick-mount brackets or magnetic bases. These parts simplify the process and reduce installation time.
Quick-mount brackets have pre-drilled holes for fast attachment.
Magnetic bases work with standard junction boxes and do not require drilling.
Wire nuts ensure secure electrical connections.
Optional tools, such as adhesive mounting strips or extra wire nuts, can make the job easier. If you install a lightweight fixture, adhesive strips may work for temporary setups. Always check the mounting kit for compatibility with your ceiling type.
Tip: Review the instructions included with your Ceiling Lights. Each model may have unique installation steps or hardware.

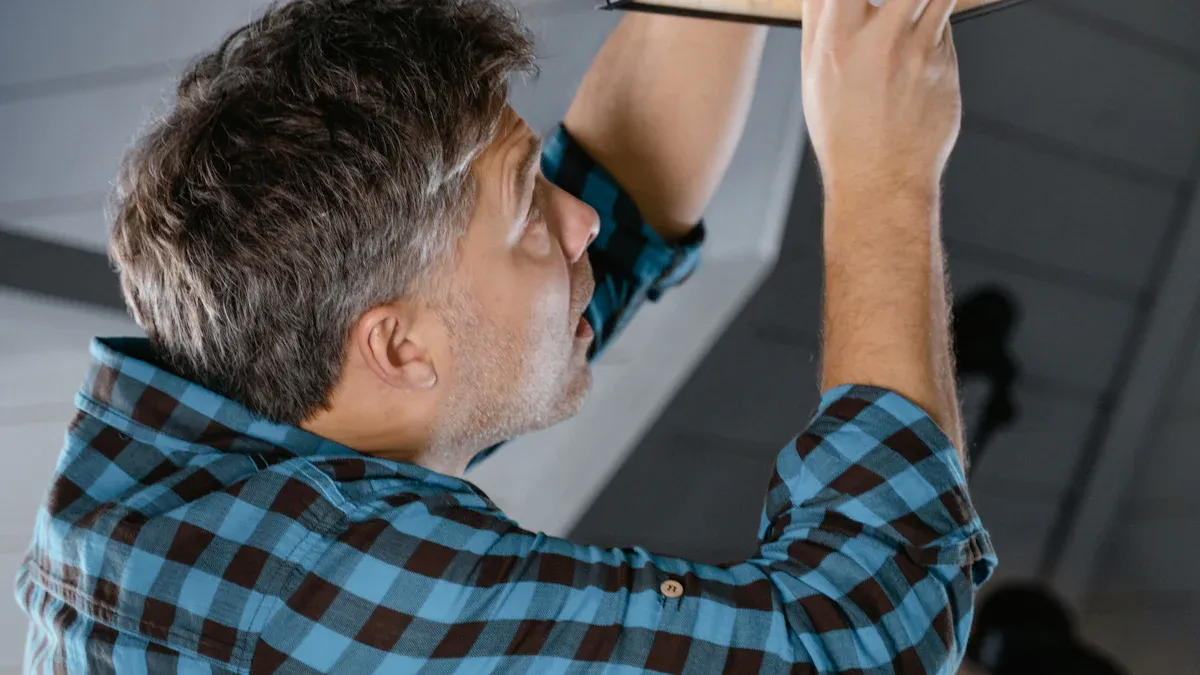
Changing a ceiling light fixture involves careful steps to ensure safety and prevent damage. You need to remove the old fixture before installing your new Ceiling Lights. Follow these steps to make the process smooth and secure.
Start by removing any globes or shades from the fixture. Use a screwdriver to loosen and remove the mounting screws that hold the fixture to the ceiling. You may find these screws on the canopy or dome where the fixture attaches. Once you remove the screws, gently lower the fixture to expose the wiring and mounting bracket.
Tip: Take a photo of the wiring before you disconnect anything. This helps you remember how the wires connect when you install the new fixture.
You must support the weight of the old fixture as you remove it. Heavy fixtures like chandeliers need extra care. Follow these steps to keep the fixture secure:
Turn off the power at the breaker box.
Set up a sturdy ladder or scaffolding to reach the ceiling safely.
Loosen the screws on the canopy or dome to access the mounting mechanism.
Support the fixture’s weight with your hands or ask someone to help you.
Take a clear photo of the wiring for reference.
Remove the screws or bolts that hold the fixture in place.
Alert: Never try to hold a heavy fixture alone. Ask a friend or family member to help you. This prevents accidents and keeps you safe.
After you lower the fixture, you need to disconnect the wires. Always check that the power is off with a non-contact voltage tester before touching any wires.
Identify the wires connected to your fixture. Most ceiling fixtures use three main wires:
Hot wire (usually black or red): Carries electricity to the fixture.
Neutral wire (usually white): Completes the electrical circuit.
Ground wire (usually green or bare copper): Provides safety by directing stray electricity away.
Some fixtures may have additional wires for dimming or special features. Look at your photo to match each wire correctly.
Wire nuts connect the fixture wires to the house wires. To disconnect:
Test each wire with a non-contact voltage tester to confirm no power flows.
Unscrew the wire nuts from each connection.
Separate the fixture wires from the house wires.
Detach the ground wire last.
Note: Loose connections can create heat and lead to fire hazards. Improper grounding may cause electrical shocks. Exposed wires pose a risk of electrical fires. Always handle wires carefully and keep them away from metal surfaces.
| Wire Color | Function | Safety Tip |
|---|---|---|
| Black/Red | Hot | Disconnect first |
| White | Neutral | Disconnect second |
| Green/Bare | Ground | Disconnect last |
You have now safely removed the old fixture. You are ready to prepare the area for your new lighting upgrade.
You should start by cleaning the area where you plan to install your new fixture. Dust and debris can collect around the old mounting bracket or electrical box. Use a dry cloth to wipe away any dirt. Remove any leftover screws or hardware from the previous fixture. This step helps you create a safe and stable surface for your new light. If you see any damage to the ceiling, patch it with spackle and let it dry before you continue. A clean workspace makes installation easier and helps your new fixture look its best.
Tip: Check for loose plaster or drywall around the box. Repair these spots to prevent future problems.
Next, inspect the electrical box in your ceiling. You need to make sure it is compatible and safe for your new fixture. Look for a box that supports at least 50 pounds. This weight rating covers most standard light fixtures. If you plan to install a ceiling fan or a heavy chandelier, check for a label that shows the box’s weight capacity. The label should be easy to find inside or on the side of the box.
All ceiling boxes must support a minimum of 50 pounds.
Boxes for ceiling fans have a specific weight rating.
The way the box attaches to the ceiling joists matters for safety and stability.
If you notice any cracks or loose screws, tighten or replace them. Make sure the box sits flush against the ceiling. A secure box prevents wobbling and keeps your fixture safe. If you have doubts about the box’s strength, consider replacing it with a new one rated for your fixture’s weight.
Alert: Never install a fixture on a damaged or unstable box. This can lead to accidents or electrical hazards.
Now you can prepare to fit your new Ceiling Lights. Modern fixtures from Yunlu Lighting offer universal fit and adjustable mounting options. These features help you match the fixture to your ceiling type and room style. You can use adjustable rods for sloped ceilings or quick-mount brackets for flat surfaces. Magnetic bases allow you to attach the fixture without drilling, which is ideal for renters or anyone who wants a fast setup.
The table below shows the benefits of universal fit and adjustable mounting options:
| Benefit | Description |
|---|---|
| Flexibility | You can use different fixture styles and lighting configurations. |
| Easy Installation | You set up the fixture quickly without special tools. |
| Cost-Effectiveness | You reduce waste and save money by using a single mounting bracket. |
| Energy Efficiency | You support energy-saving lighting and help the environment. |
Yunlu Lighting designs fixtures to work with most standard electrical boxes. You do not need special adapters or extra hardware. Adjustable mounting options let you customize the height and angle of your light. This makes it easy to create the look you want in any room.
Note: Always follow the instructions that come with your fixture. Each model may have unique steps for mounting and adjustment.
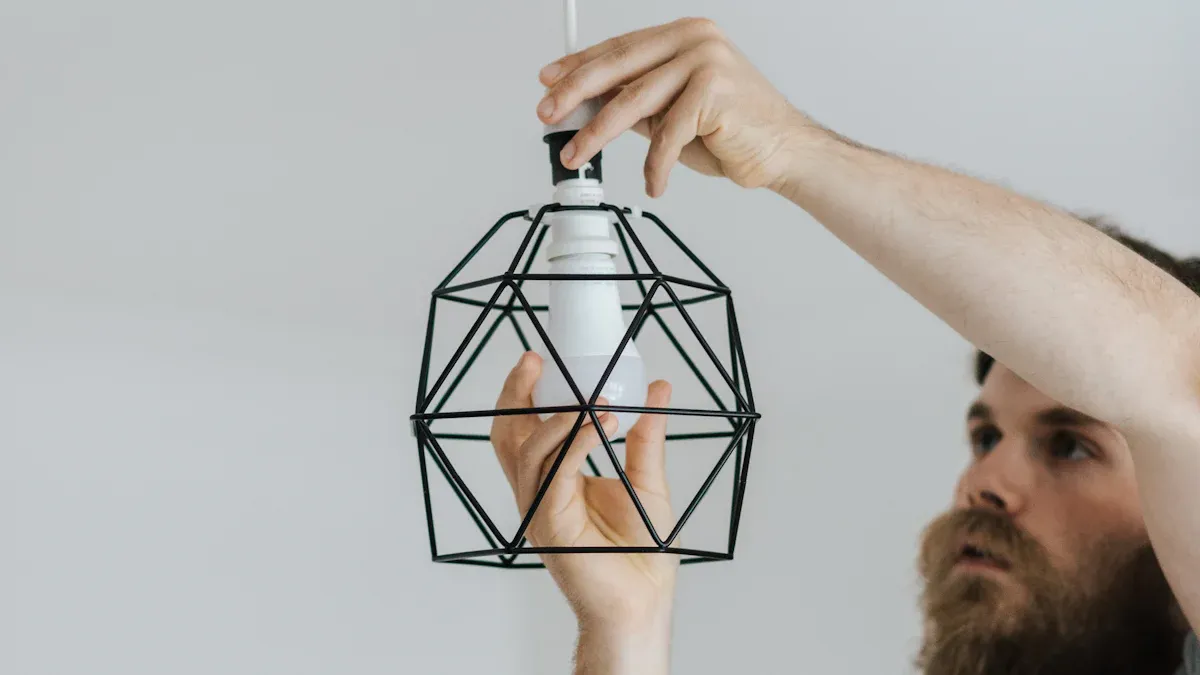
Installing your new fixture is the most rewarding part of the process. You bring fresh style and better lighting to your space. Follow these steps to ensure a safe and secure installation.
Proper wire connections keep your fixture working safely. Take your time and double-check each step.
You will see three main wires in most ceiling setups:
Black or red wire: This is the hot wire. It carries electricity to your fixture.
White wire: This is the neutral wire. It completes the circuit.
Green or bare copper wire: This is the ground wire. It protects you from electrical faults.
Match each wire from your new fixture to the same color wire in your ceiling. Twist the ends of the matching wires together.
Tip: Always use a non-contact voltage tester before touching any wires. Confirm that no power flows through the wires.
After you match the wires, secure each connection with a wire nut. Twist the nut clockwise until it feels tight and the wires do not move. Gently tug on each wire to check the connection. A loose wire can cause flickering or even a fire hazard.
Connect the ground wires first. Attach the fixture’s ground wire to the house ground wire. For metal boxes, connect both the box and fixture to the ground.
Join the neutral wires next. Twist the fixture’s white wire to the house white wire.
Finish with the hot wires. Connect the fixture’s black (or red) wire to the house black (or red) wire.
Alert: Never leave exposed copper outside the wire nut. Cover all bare wire for safety.
Once you finish wiring, you can mount the fixture to the ceiling. Yunlu Lighting offers several user-friendly options:
Quick-mount brackets: These brackets come with pre-drilled holes and included screws. You can attach the fixture in about 15 minutes, much faster than traditional methods.
Magnetic bases: Some models let you click the fixture into place without using tools. This feature works well for renters or anyone who wants a fast, clean installation.
Plug-and-play designs: You simply plug the fixture into an existing socket or use a detachable cord. No hardwiring is needed.
Hold the fixture close to the ceiling and align it with the mounting bracket or magnetic base. Secure it with the provided screws or let the magnets snap it into place. Make sure the fixture feels stable and does not wobble.
Note: The average installation time for modern fixtures like these is about one to two hours. Complex designs may take longer.
Finish your installation by adding any covers, shades, or decorative elements. These parts hide the wiring and mounting hardware, giving your Ceiling Lights a polished look. Snap or screw the cover into place according to the instructions.
Many modern fixtures include dimmable or battery-powered features:
Dimmable lights: Adjust the brightness to fit your mood or activity. These lights work with standard dimmer switches.
Battery-powered options: Install lights anywhere, even if you do not have wiring. Move them easily when you rearrange your space.
These features give you flexibility and make upgrades simple. You can enjoy stylish lighting without hiring an electrician.
Tip: Always check the manufacturer’s instructions for special features or extra steps.
You have now installed your new fixture. Enjoy the improved lighting and modern style in your room.
You have installed your new ceiling light fixture. Now you need to restore power and check your work. Follow these steps to do this safely:
Make sure all wires are secure and covered with wire nuts.
Confirm the fixture is mounted tightly and does not wobble.
Turn the wall switch to the "off" position.
Go to your breaker box and flip the circuit breaker back on.
Use a voltage tester to check that power reaches the switch and the fixture terminals.
Verify the switch wiring. The hot wire should connect correctly.
Check for a loose neutral wire in the junction box.
If the switch does not work, replace it with a new one.
Always turn off power before inspecting any wiring.
Tip: Stand on a sturdy ladder when you test the fixture. Keep your hands dry and avoid touching metal parts.
After you restore power, test your new ceiling light. Flip the wall switch to the "on" position. The light should turn on smoothly and shine brightly. If you installed a dimmable fixture, adjust the dimmer to check the brightness levels. For battery-powered or plug-and-play models, press the power button or use the remote control.
If the light does not work as expected, use this table to find common problems and solutions:
| Issue | Solution |
|---|---|
| Bulb not working | Check if the bulb is tight in the socket. Replace it if it is burnt out. |
| Flickering light | Replace the switch or check for loose wiring connections. |
| Recessed lights not working | Confirm the bulb wattage is correct. Check for proper ventilation around the fixture. |
| Pull-chain light not working | Follow the troubleshooting steps for pull-chain or switch-controlled fixtures. |
Note: Always use bulbs that match the recommended wattage for your fixture. This prevents overheating and damage.
If your new ceiling light does not function, follow these troubleshooting steps:
Check the position of the light switch. Make sure it is in the "on" position.
Inspect all electrical connections. Confirm they are secure and correctly wired.
Look for blown fuses or tripped breakers in your electrical panel.
Examine the light fitting. Ensure the bulb is securely in place.
Listen for crackling sounds at the switch. This may signal a poor connection.
Confirm the bulb wattage matches the fixture’s requirements.
⚠️ Alert: If you cannot find the problem or feel unsure about electrical work, contact a licensed electrician. Safety always comes first.
You have now completed the power and test steps. Your new ceiling light should brighten your space and work reliably. Enjoy your upgraded room and the benefits of modern lighting.
You may face a few challenges when installing or using ceiling light fixtures. Knowing what to look for helps you solve problems quickly and safely. Here are some common issues you might encounter:
Loose electrical connections often cause buzzing, flickering, or even complete failure of your light fixture. You should always check that wire nuts are tight and wires are secure.
Flickering lights can happen if you use an incompatible dimmer switch or if the LED bulb is faulty. Try replacing the bulb or using a dimmer that matches your fixture.
A loose bulb connection can lead to intermittent flickering. Make sure each bulb fits snugly in its socket.
Loose connections anywhere in the circuit may create shock hazards or increase the risk of electrical fires. Inspect all wiring before you restore power.
If your fixture uses plug-and-play or magnetic mounts, check that all parts click or snap into place. Universal fit brackets should align with your ceiling box for a stable installation.
Tip: If you notice flickering, buzzing, or no light, start by tightening all connections and checking the bulb. Many problems have simple solutions.
You can avoid many installation headaches by choosing fixtures with user-friendly features. Yunlu Lighting’s Ceiling Lights offer magnetic mounts and universal fit options. These designs make installation easier and reduce the risk of wiring mistakes.
Sometimes, you may need help from a licensed electrician. Safety should always come first. You should call a professional in these situations:
You feel unsure about any part of the electrical work.
You see exposed wires or inconsistent power supply during troubleshooting.
You find complex wiring problems that you cannot fix with basic tools.
You want to ensure your installation meets local safety codes and regulations.
⚡ Alert: Never attempt repairs if you suspect a serious electrical issue. A licensed electrician has the training to handle complex problems safely.
Yunlu Lighting supports you before and after your purchase. You can rely on their quality assurance and customer service for guidance. The table below shows the support services available:
| Service Type | Description |
|---|---|
| After-Sales Service | High-quality support to enhance your experience and satisfaction. |
| Technical Support | Help with installation and troubleshooting to keep your lights working well. |
| Pre-Sales Consultation | Advice to help you choose the right fixture for your space. |
If you need help, reach out to Yunlu Lighting’s support team. You get expert advice and solutions for any issue. Quality assurance ensures your fixture works as promised. You can enjoy peace of mind with every purchase.
Note: Choosing a fixture with strong after-sales support makes your upgrade easier and more reliable.
You can upgrade your space by following clear steps: turn off power, remove the old fixture, connect wires, and mount your new light. Modern fixtures like Yunlu Lighting offer strong safety and performance benefits:
| Benefit | Description |
|---|---|
| Energy Efficiency | Uses less energy, saving you money. |
| Longevity | Lasts longer, reducing replacements. |
| Improved Visibility | Brightens rooms, making them safer. |
| Safety Features | Helps prevent accidents in busy areas. |
| Versatile Design | Fits many styles and spaces. |
| Adjustable Brightness | Lets you set the mood for any activity. |
| Smart Technology | Adds convenience with app or voice control. |
Enjoy your new Ceiling Lights and keep them clean for best results. If you face complex wiring or safety concerns, contact a licensed electrician. For advanced lighting projects, explore guides that cover preparation, installation, and maintenance.
You can use plug-and-play or battery-powered models from Yunlu Lighting. These fixtures do not require hardwiring. You simply attach the fixture and plug it in or use the battery module. This option works well for renters or temporary setups.
You need a screwdriver, wire strippers, a voltage tester, and a sturdy ladder. Some fixtures include quick-mount brackets or magnetic bases. You may also use wire nuts and adhesive strips for easier installation.
Check the weight rating on the box. Most boxes support up to 50 pounds. Look for a label inside or on the side. If you plan to install a heavy fixture, make sure the box is rated for extra weight.
You can install most fixtures safely if you turn off the power at the breaker and use a voltage tester. Wear safety gear and follow instructions. If you feel unsure, contact a licensed electrician.
Check the bulb and wiring connections. Make sure the power is on at the breaker. Use a voltage tester to confirm electricity reaches the fixture. Replace the bulb if needed. If problems continue, seek help from a professional.
You need a fixture and switch that support dimming. Yunlu Lighting offers dimmable models. Always check the product description and use compatible bulbs and switches for best results.
Turn off the power before cleaning. Use a dry cloth to wipe dust from the fixture. Avoid water or harsh chemicals. Clean covers and shades gently. Regular cleaning keeps your light bright and attractive.
You can contact Yunlu Lighting’s customer service for help. They provide after-sales support and technical advice. You get guidance for installation, troubleshooting, and choosing the right fixture for your space.